Overview
Building an AI video ad generator sounds simple on the surface, but there are many moving parts behind it—script generation, media handling, long video renders, and saving project data all need to work together smoothly. This post explains how our AI video ad generator was built and how the pieces fit together in a real product.
The goal is straightforward: turn a topic into a shareable video ad with minimal effort using our AI video ad generator. A user enters a topic, picks a style, and the system helps create a ready-to-share video. Making this feel “one-click,” however, requires careful system design.
Instead of building everything as one big flow, we split the system into a clear three-phase journey:
- Phase A: Generate scripts & create a project — Generate scripts and create a saved project.
- Phase B: Customize the ad (avatar, voice, background) — Customize the project (avatar, voice, background).
- Phase C: Render the video (async workflow) — Render the final video in the background and store the result.
We’ll walk through each phase step by step (each with a diagram). The focus isn’t just features—it’s how to design a workflow that stays reliable as you add users, providers, and longer render times.
Tech stack
At a high level, the stack is intentionally “separated by responsibility.” Instead of forcing one tool to do everything, each service has a clear role in the system.
- Next.js (Frontend UI): Handles the user interface and the full journey across Phase A, B, and C. It manages inputs, previews, and status updates while keeping the experience smooth.
- Clerk (Authentication): Takes care of sign-in and user identity. This ensures every project is linked to the right user without building auth from scratch.
- FastAPI (Backend Orchestration): Works as the central coordinator. A single backend handles script generation requests, media lists, image uploads, and render triggers. This keeps the architecture simple and maintainable.
- OpenRouter → Gemini (LLM): Generates multiple ad script options from one topic. This is what removes the “blank page” problem for users.
- HeyGen (Video Provider): Provides avatars and voices, and performs the talking-avatar video rendering.
- ImageKit (Asset Hosting): Stores uploaded background images and returns reliable public URLs that can be used during rendering.
- Supabase (Database): Stores project data, selected options, and render status. This allows projects to be saved and resumed.
- Inngest (Async Workflows): Runs the long video render in the background so the UI stays fast and responsive.
How It Works (End-to-End)
This is the full journey from idea to finished video. The goal is to show the AI video ad generator end-to-end without getting lost in low-level server details. Think of it as the product flow from a builder’s point of view.
Phase A — Generate Scripts & Create a Project
Everything starts with one input: a topic (or product idea). From that single input, the system generates three short ad scripts. This is deliberate: instead of trying to produce one “perfect” result, it gives options so different tones and hooks can be explored.
Once the scripts are ready, the system immediately creates and saves a project. This matters because it turns a temporary output into something durable. From here on, all actions are tied to this project, and the user is taken to a dedicated project page where the ad can be refined and customized.
The diagram below shows this flow visually—idea → scripts → saved project → project page—in one quick view.
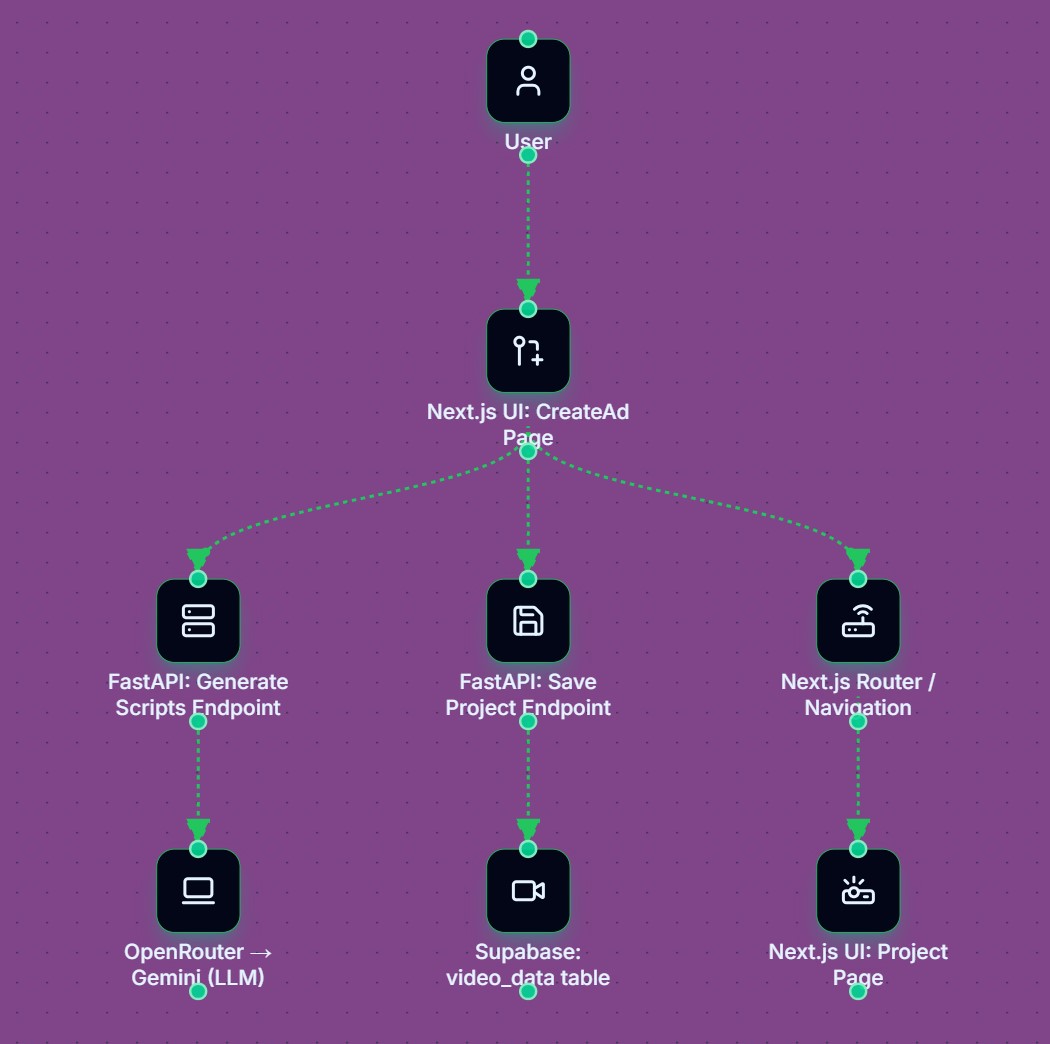
Fig. 1. Phase A flow — idea → scripts → saved project → project page.
Phase B — Customize the Ad (Avatar, Voice, Background)
Now the flow shifts from writing to creative assembly. On the project page, the user selects:
- an avatar (who appears on screen)
- a voice (how it sounds)
- a background (the visual setting)
The system fetches available avatars and voices from the video provider. Any uploaded background image is hosted and prepared for the final render.
This phase is designed to feel quick and interactive. There’s no heavy processing here—just browsing, choosing, and updating the project.
The figure below shows this phase visually, with the project page acting as the hub that connects to avatar selection, voice selection, and background upload.
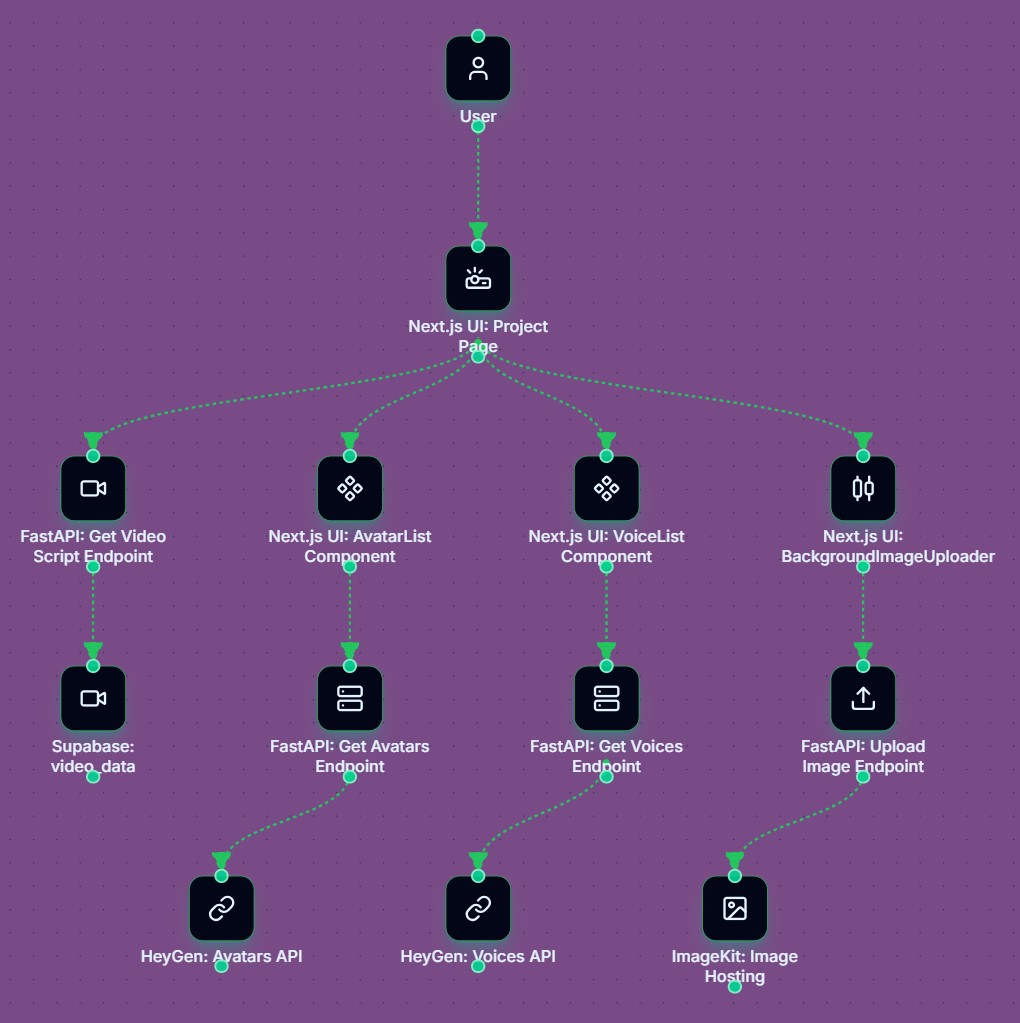
Fig. 2. Phase B hub — project page connecting avatar, voice, and background selection.
Phase C — Render the Video (Async Workflow)
This is where the heavy work happens. After picking the script, avatar, voice, and background, the last step is to turn those choices into a real video. That sounds simple, but video rendering takes time—sometimes seconds, sometimes minutes—depending on length and provider load.
If the app tried to do this in one request, the page could hang or fail. So instead of making users wait, the system sends the job to the background. When the user clicks Generate Video, the app saves the request and starts the render behind the scenes. From the user’s point of view, the UI stays responsive and can show progress updates.
Behind the scenes, the flow is roughly like this:
- The request with all selections is sent to the backend
- The system marks the project as “rendering”
- A background workflow takes over
- The video provider generates the talking-avatar video
- When it’s done, the final video link is saved
- The project status updates to “completed”
Because this runs in the background, nothing breaks if the user refreshes or leaves the page. They can come back later and the video will still be there.
This step is what makes the app feel like a real product instead of a demo. The heavy work happens quietly in the background while the interface stays fast and simple.
The figure below shows this flow visually — from clicking generate to background rendering and finally saving the finished video.
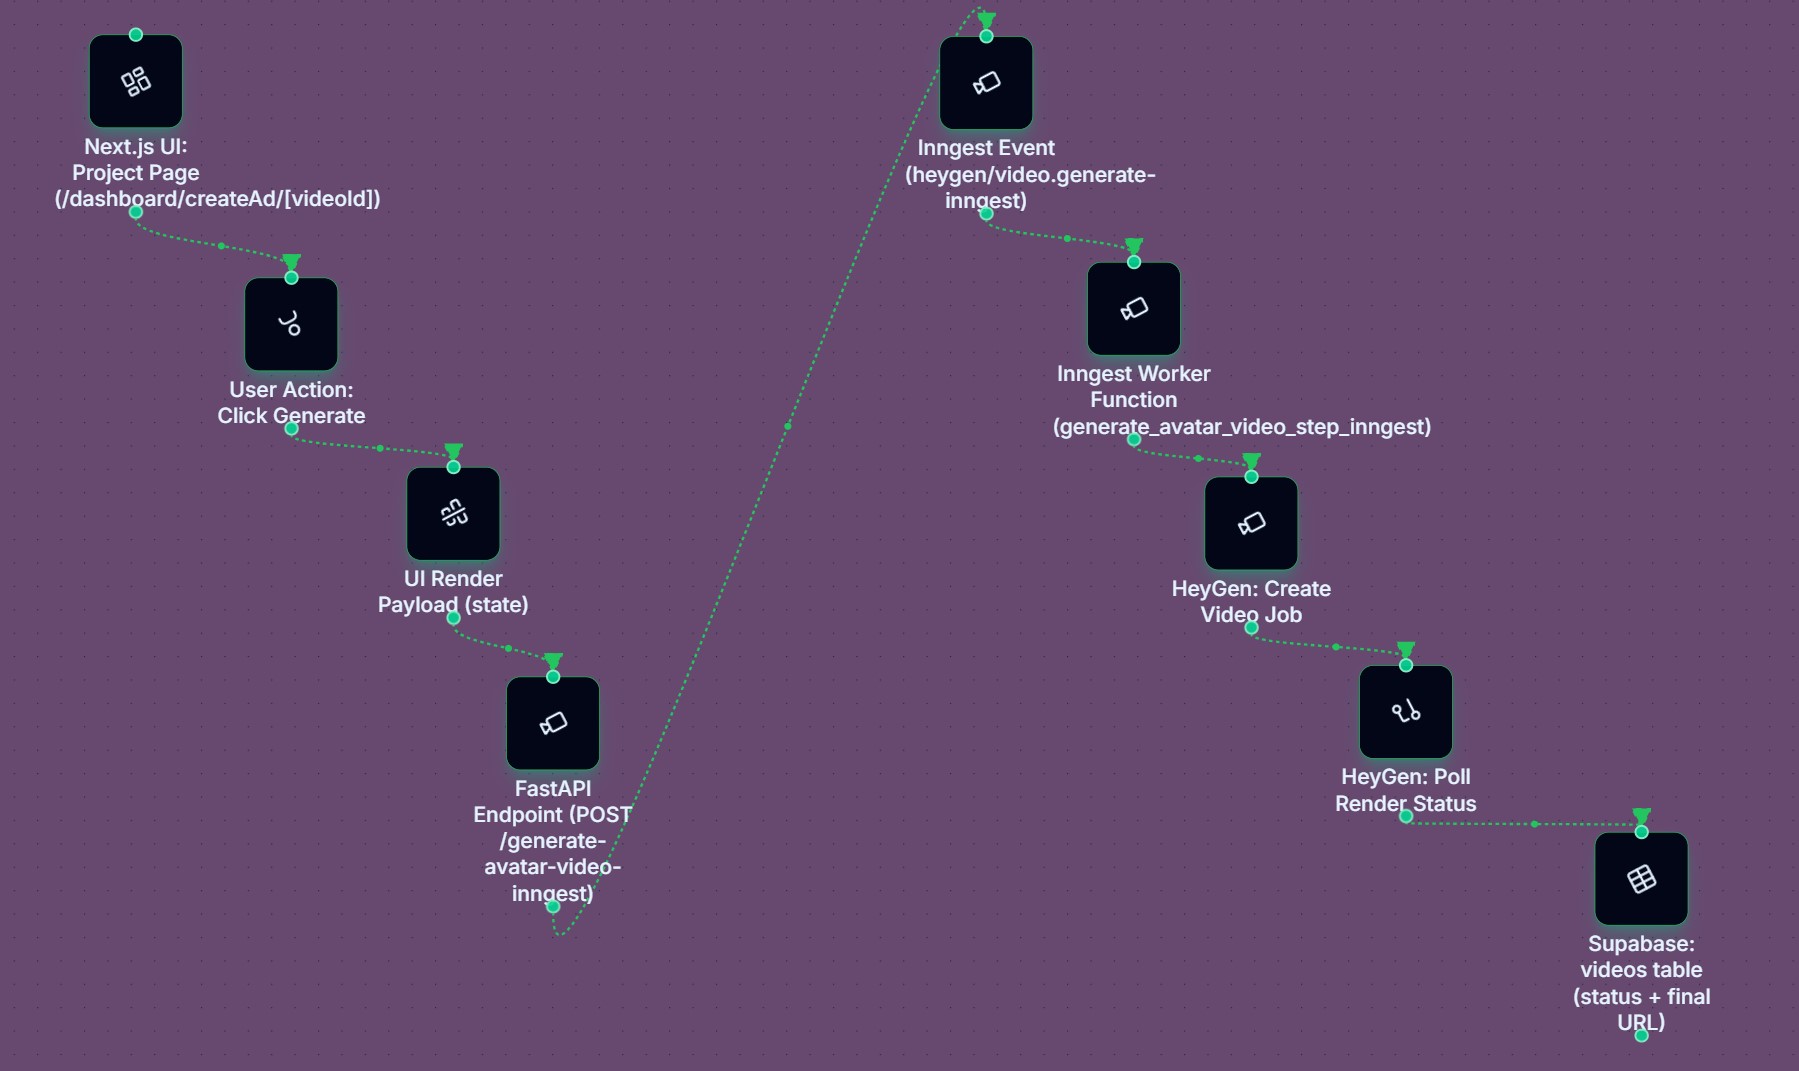
Fig. 3. Phase C async render — request → background workflow → final video saved.
Architecture Breakdown (Behind the Scenes)
A simple way to understand the architecture is to think of it as four “lanes.” Each lane has one job, and together they support the three phases you saw earlier.
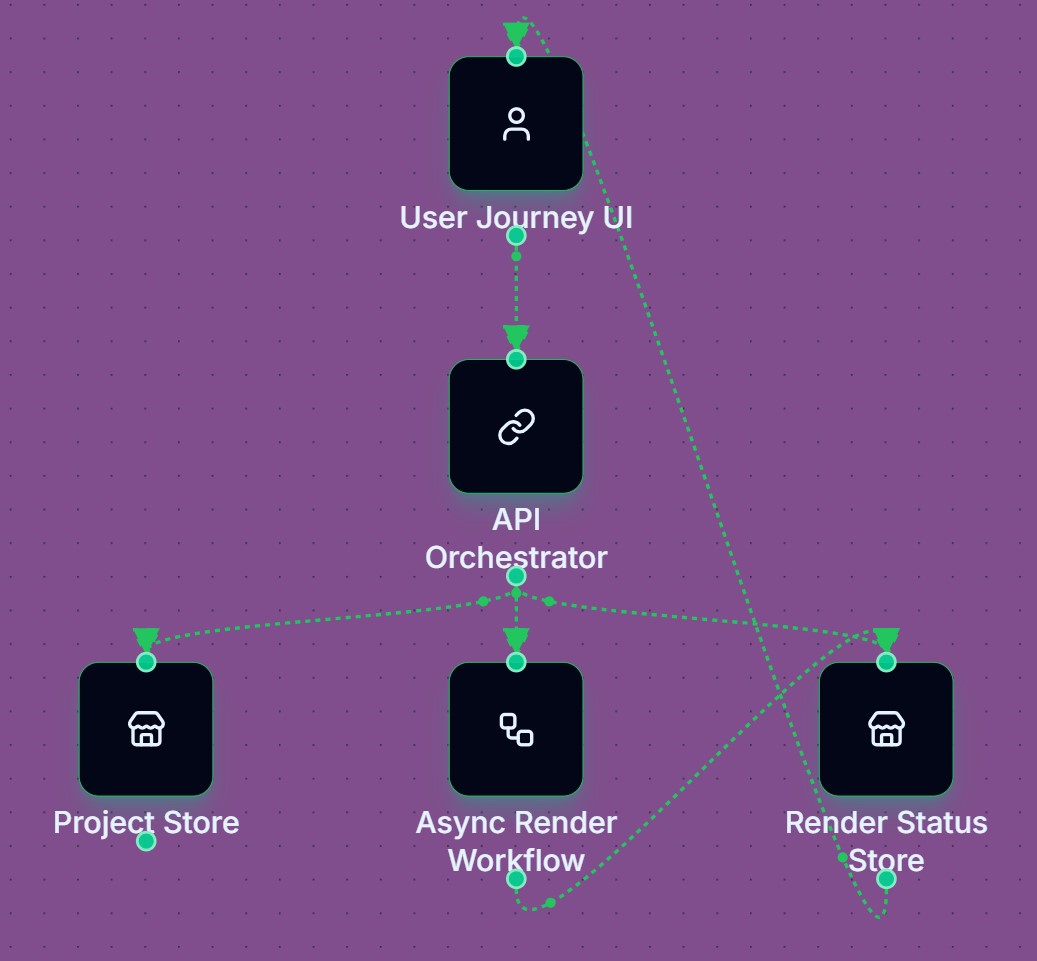
Fig. 4. System architecture lanes — experience, orchestration, async work, and source of truth.
Experience lane (Frontend)
This is the User Journey UI in the diagram — the top box. It’s everything the user interacts with: entering a topic, reviewing scripts, customizing the ad, and starting the render. Its job is not to do heavy work; its job is to feel smooth. Even if rendering takes a while, the UI should never feel stuck.
Orchestration lane (Backend)
This is the API Orchestrator in the middle of the diagram. It acts like a coordinator: it receives requests from the UI and routes them where they need to go.
For example, it:
- sends prompts to the LLM
- fetches avatars and voices
- stores project data
- triggers the render workflow
- reads render status
It’s not doing the rendering itself — just connecting pieces.
Work lane (Async rendering)
This is the Async Render Workflow box. This lane handles the heavy lifting: video rendering can take time, so it runs outside the normal request cycle.
When triggered, it:
- starts the render job with the provider
- waits or polls for completion
- saves the final result when ready
Moving this to the background avoids timeouts and keeps the app stable.
Source-of-truth lane (Database)
These are the Project Store and Render Status Store boxes. They give the system memory: projects are saved here, render progress is saved here, and final video links live here—so nothing is lost if a user refreshes or comes back later.
Key engineering decisions
Avoiding the “Mega Screen”
One of the biggest early decisions was to avoid building a giant “do-everything” screen. It sounds convenient, but in practice it gets messy fast. Users don’t know where to focus, and the logic becomes hard to manage. Splitting the flow into three phases (generate → customize → render) kept both the UX and the architecture simple. Each step has a clear purpose, and that makes the whole system easier to explain and maintain.
Treating Rendering as a Background Job
Video rendering is slow and sometimes unpredictable. If it runs inside a normal request, you risk timeouts and a frozen UI. Moving rendering into an async workflow solved several problems at once: the interface stays responsive, progress can be tracked properly, and users don’t feel stuck waiting on one screen.
Letting External Services Do Their Job
Instead of building everything from scratch, we leaned on tools that already do these jobs well:
- The LLM focuses on writing.
- HeyGen focuses on avatar videos.
- ImageKit focuses on image hosting.
- Supabase focuses on storage.
This kept us from reinventing complex systems and let us focus on orchestration and product logic. It’s not about outsourcing the core idea — it’s about not rebuilding hard problems that others have already solved.
Storing Outcomes, Not Just Actions
A quieter but important decision was to persist outcomes, not just actions. Scripts, selections, render status, final URLs — all of it gets saved. That’s what makes the app feel like a real tool instead of a temporary demo: users can leave, come back, and pick up where they left off.
Where Things Got Tricky
A few parts of this project turned out to be harder than they looked.
Async Video Rendering
Video generation takes time, so it can’t run inside a normal request. It has to run in the background. That improves user experience, but adds complexity: triggering jobs, tracking status, and saving results correctly. Async systems are great, but they come with more moving parts.
External API Integration
HeyGen and ImageKit needed very specific payloads and response handling. Even small mismatches could break the whole flow. Most real debugging time went into these integrations, not the AI itself. That’s the reality of building on top of multiple services.
Handling Multiple Providers in One Flow
When several external services are part of one journey, failures need to be isolated. If an image upload fails, the user should know right away. If rendering fails, it should show a clear final status — not leave the UI stuck “processing.” Designing these failure paths properly is what keeps the app usable when things go wrong.
Conclusion
Building this AI video ad generator reminded us of a simple truth: a good AI product is not just about calling a model. It’s about shaping a workflow that feels easy for the user while staying dependable behind the scenes.
That’s the reason we organized the app into three phases. Phase A helps users move from a blank idea to real script options in seconds. Phase B lets them shape the ad into something that feels like theirs, with an avatar, voice, and background. Phase C is where reliability matters most — rendering happens in the background, the UI stays responsive, and the final video is saved so nothing gets lost.
On the surface, the product feels simple. Underneath, it’s designed for real-world limits: slow renders, external APIs, and the need to save state properly. The three diagrams in this post reflect that approach — each one focuses on a small part of the system so the whole flow stays easy to understand.
If you’re building something similar — mixing AI, third-party services, and async work — this project shows that you don’t need a complex UX to support a complex system. Clear steps, clean separation of roles, and a workflow-first mindset go a long way.
Work With Me
If you want to build something similar—AI + third-party providers + async workflows—but you need it to feel calm and reliable in production, reach out via the contact page.