
Overview
Imagine you are tasked to develop a wildlife conservation application to identify and monitor endangered species in a rainforest using camera trap images. Your goal is to create an image classification model that can recognize various species of animals, such as tigers, elephants, monkeys, lions, wolves, and rare birds.
In doing so, you may encounter several challenges, such as,
Limited Data: You only have a few hundred labeled images for each species.
Time Constraints: You want to deploy the model quickly to start monitoring animals and collecting data.
Computational Resources: Your computational resources are limited. This may make it difficult for you to develop a complex model from scratch.
However, you can overcome these challenges using transfer learning and easily build a highly accurate image classification model.
What Is Transfer Learning?
Transfer learning is a technique of machine learning where a pre-trained model for one task is reused as the starting point to develop a model for a different but related task. Instead of developing a new model from scratch, we can transfer the knowledge learned by a pre-trained model on a large dataset to model a different but related problem.
If you want to know more about transfer learning, you can check out my previous blog post.
What Is VGGNet Architecture?
VGGNet is a deep convolutional neural network proposed by the Visual Geometry Group (VGG) at the University of Oxford. There are two main variants of VGGNet: VGG16 (16 layers) and VGG19 (19 layers).
Among them, the VGG16 secured second place in the ImageNet Large Scale Visual Recognition Challenge (ILSVRC), achieving a top-5 test accuracy of 92.7% on the ImageNet dataset. The success of VGG16 on the ImageNet dataset involving 1000 diverse classes makes it highly popular for various image classification tasks.
The VGG16 architecture consists of 16 layers: 13 convolutional layers, three fully connected layers, and five max-pooling layers. If you want to know more about VGG16 architecture, you can refer to our previous article on VGGNet. Additionally, you can check this paper written by Karen Simonyan and Andrew Zisserman: Very Deep Convolutional Networks for Large-Scale Image Recognition.
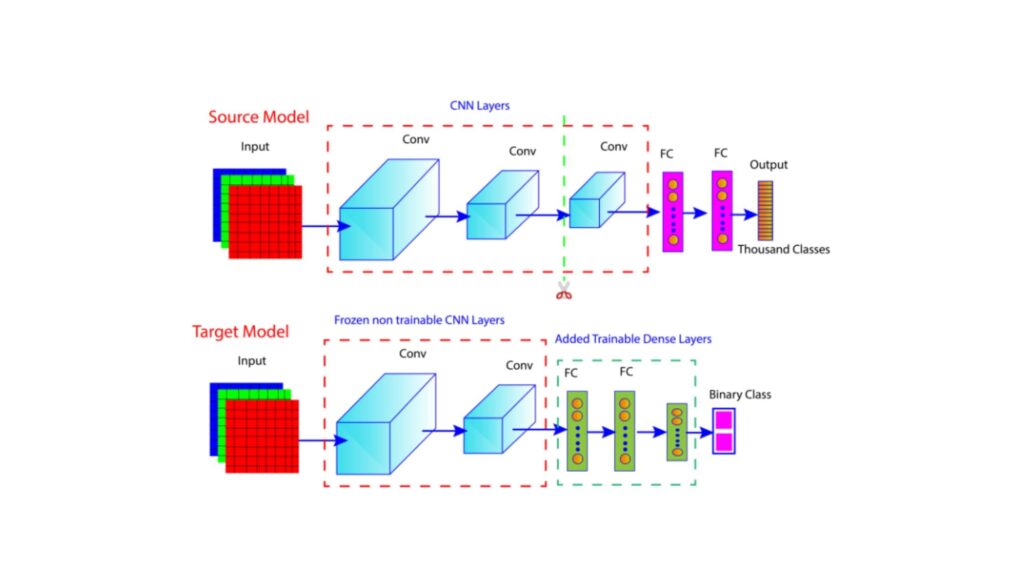
How To Utilize VGG16 For Transfer Learning?
There are two main methods of transfer learning: feature extraction and fine-tuning.
Feature Extraction
Here, the pre-trained model is used as a fixed feature extractor. You can use the following steps to use VGG16 for feature extraction.
Load The Pre-trained Model
Load the VGG16 model pre-trained on the ImageNet dataset.
Remove The Top Layers
Remove the top layers (fully connected layers) of the VGG16 as they are specific to the original task (ImageNet classification).
Freeze the Convolutional Layers
Freeze the weights of the convolutional layers so that they don’t get updated during training. This way, the convolutional layers act as a fixed feature extractor. The main task of the frozen layers is to extract meaningful features from the input images.
Add a New Classifier
Add new fully connected layers (classifier) specific to your task on the top of the frozen convolutional layers. For example, if you want to classify animals, you can add a dense layer with SoftMax activation for multi-class classification.
Train the New Classifier
Train the new classifier using your specific dataset. Features learned by frozen convolutional layers act as input to the new classifier. The new classifier will learn how to map these features to the new classes.
Fine Tuning
In fine-tuning, some of the top layers of the pre-trained model are unfrozen, and they are trained together with the newly added classifier. This allows the model to adapt more closely to the new task. You can use the following steps to fine-tune VGG16.
Load pre-trained VGG16 model: The first step is to load the VGG16 model pre-trained on the ImageNet dataset.
Freeze Initial Layers: Freeze the weights of the lower-level layers. This helps to retain the low-level features.
Unfreeze Top Layers: Unfreeze some of the higher-level layers. This lets the model update the weights of the unfrozen layers during training.
Add New Classifier: The original classifier of the VGG16 is unsuitable for your specific task since it was trained to classify 1000 ImageNet datasets. Instead, you must add a new classifier to the modified pre-trained model specific to your task.
The new classifier typically consists of one or more fully connected layers (a combination of dense layers), dropout layers for regularization, and an output layer matching the number of classes in your specific dataset.
Practical Implementation
Import Necessary Libraries
					from keras.datasets import cifar10
from sklearn.model_selection import train_test_split
from keras.utils import to_categorical
from keras.applications.vgg16 import VGG16, preprocess_input
from keras import models
from keras import layers
from keras import optimizers
import tensorflow as tf
import matplotlib.pyplot as plt
Data Processing
Load Data
					# Load CIFAR-10 dataset
(x_train, y_train), (x_test, y_test) = cifar10.load_data()
					print(x_train.shape)
print(x_test.shape)
					print(y_train.shape)
print(y_test.shape)
Normalize The Data
					x_train = x_train / 255.0
x_test = x_test / 255.0
Convert The Categorical Labels To One-hot Encoded Vectors
					y_train = to_categorical(y_train, 10)
y_test = to_categorical(y_test, 10)
					print(y_train.shape)
print(y_test.shape)
Split Training Data Into Train And Validation sets
x_train, x_val, y_train, y_val = train_test_split(x_train, y_train, test_size=0.1, random_state=42)
Load The Pre-trained VGG16 Model
					# Load The Pretrained VGG16 Model trained On the Imagenet Dataset
base_model = VGG16(weights='imagenet', include_top=False, input_shape=(224, 224, 3))
					# Print Model Summary
base_model.summary()
Build Model
					# Create a Sequential model
model = models.Sequential()
					# Add UpSampling2D layer
model.add(layers.UpSampling2D((7, 7)))
					# Add VGG16 as base model
model.add(base_model)
					# Add GlobalAveragePooling2D layer
model.add(layers.GlobalAveragePooling2D())
					# Add Output layer
model.add(layers.Dense(10, activation='softmax'))
Compile The Model
model.compile(optimizer=optimizers.RMSprop(learning_rate=1e-4), loss='categorical_crossentropy', metrics=['acc'])
Train The Model
					# Use GPU for training
with tf.device('/device:GPU:0'):
    history = model.fit(x_train, y_train, epochs=5, batch_size=20, validation_data=(x_val, y_val))
Evaluate Model Performance
model.evaluate(x_test, y_test)
Visualize The Model Performances
					# Plot training & validation accuracy values
plt.figure(figsize=(12, 4))

plt.subplot(1, 2, 1)
plt.plot(history.history['acc'])
plt.plot(history.history['val_acc'])
plt.title('Model accuracy')
plt.ylabel('Accuracy')
plt.xlabel('Epoch')
plt.legend(['Train', 'Validation'], loc='upper left')
					# Plot training & validation loss values
plt.subplot(1, 2, 2)
plt.plot(history.history['loss'])
plt.plot(history.history['val_loss'])
plt.title('Model loss')
plt.ylabel('Loss')
plt.xlabel('Epoch')
plt.legend(['Train', 'Validation'], loc='upper left')

plt.show()
Fine Tuning
					# Unfreeze some layers in the convolutional base for fine-tuning
base_model.trainable = True
fine_tune_at = 100  # Unfreeze from this layer onwards
					# Compile the model for fine-tuning
model.compile(optimizer=optimizers.RMSprop(learning_rate=1e-4), loss='categorical_crossentropy', metrics=['acc'])
					# Train the model with fine-tuning
history_fine = model.fit(x_train, y_train, epochs=5, batch_size=20, validation_data=(x_val, y_val))
					# Evaluate the model after fine-tuning
model.evaluate(x_test, y_test)
Conclusions
Frequently Asked Questions
References And Further Reading

Dr. Partha Majumder is a distinguished researcher specializing in deep learning, artificial intelligence, and AI-driven groundwater modeling. With a prolific track record, his work has been featured in numerous prestigious international journals and conferences. Detailed information about his research can be found on his ResearchGate profile. In addition to his academic achievements, Dr. Majumder is the founder of Paravision Lab, a pioneering startup at the forefront of AI innovation.
Thank you for your sharing. I am worried that I lack creative ideas. It is your article that makes me full of hope. Thank you. But, I have a question, can you help me?
Your article helped me a lot, is there any more related content? Thanks!